Did Windows Home Server “Spontaneously” Reboot?
When certain errors occur, Windows Home Server
reboots itself. This apparently random behavior is actually built into
the system in the event of a system failure (also called a stop error or a blue screen of death—BSOD).
By default, Windows Home Server writes an error event to the system
log, dumps the contents of memory into a file, and then reboots the
system. So, if your system reboots, check the Event Viewer to see what
happened.
You can control how Windows Home Server handles system failures by following these steps:
1. | Select
Start, right-click Computer, and then click Properties to open the
System window. (Alternatively, select Start, Control Panel, System.)
|
2. | Click Advanced System Settings. This opens the System Properties dialog box with the Advanced tab displayed.
|
3. | In the Startup and Recovery group, click Settings. Figure 3 shows the Startup and Recovery dialog box that appears.
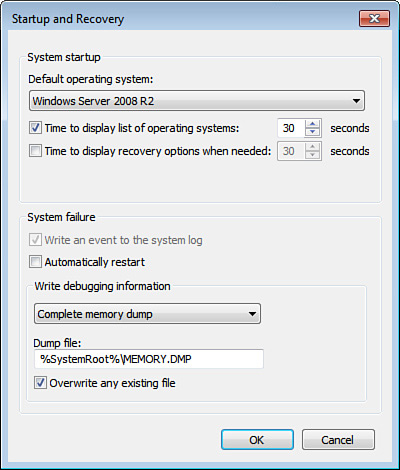
|
4. | Configure how Windows Home Server handles system failures using the following controls in the System Failure group:
| Write an Event to the System Log | This
option (which you can’t deactivate in Windows Home Server) ensures that
the system failure is recorded in the system log. This enables you to
view the event in the Event Viewer. | | Automatically Restart | This
is the option that, when activated, causes your system to reboot when a
stop error occurs. Deactivate this check box to avoid the reboot. | | Write Debugging Information | This
list determines what information Windows Home Server saves to disk (in
the folder specified in the text box below the list) when a system
failure occurs. This information—it’s called a memory dump—contains data that can help a tech support employee determine the cause of the problem. You have five choices:
- None— No debugging information is written.
- Small Memory Dump (64 KB)—
This option writes the minimum amount of useful information that can be
used to identify what caused the stop error. This 64KB file includes
the stop error number and its description, the list of running device
drivers, and the processor state.
- Kernel Memory Dump—
This option writes the contents of the kernel memory to the disk. (The
kernel is the Windows Home Server component that manages low-level
functions for processor-related activities, such as scheduling and
dispatching threads, handling interrupts and exceptions, and
synchronizing multiple processors.) This dump includes memory allocated
to the kernel, the hardware abstraction layer, and the drivers and
programs that the kernel uses. Unallocated memory and memory allocated
to user programs are not included in the dump. This information is the
most useful for troubleshooting, so I recommend using this option.
- Complete Memory Dump— This option writes the entire contents of RAM to the disk.
|
|
Caution
Windows Home Server first writes the debugging information to the paging file—pagefile.sys
in the root folder of Drive C: When you restart the computer, Windows
Home Server transfers the information to the dump file. Therefore, you
need to have a large enough paging file to handle the memory dump. This
is particularly true for the Complete Memory Dump option, which requires
the paging file to be as large as the physical RAM, plus one megabyte.
The file size of the Kernel Memory Dump is typically about one-third of
physical RAM, although it may be as large as 800MB.
| | Overwrite Any Existing File— When
this option is activated, Windows Home Server overwrites any existing
dump file with the new dump information. If you deactivate this check
box, Windows Home Server creates a new dump file with each system
failure. Note that this option is enabled only for the Kernel Memory
Dump and the Complete Memory Dump (which by default write to the same
file: %SystemRoot%\Memory.dmp).
|
Did You Recently Change Any Application Settings?
If you did just change application settings, try
reversing the change to see whether doing so solves the problem. If that
doesn’t help, check to see whether an upgrade or patch is available.
Also, some applications come with a “Repair” option that can fix
corrupted files. To try this out, follow these steps:
1. | Select Start, Control Panel, Add or Remove Programs.
|
2. | Make sure the Change or Remove Programs tab is displayed.
|
3. | Click the program you’re having trouble with.
|
4. | Click
the Change button. (You may need to click the Change/Remove button,
instead. If you only see a Remove button, it means the program doesn’t
offer a repair option.) The application’s install program launches.
|
5. | Select the Repair option, if one exists.
|
6. | Click Next to run the repair.
|
If repairing the program doesn’t work, try reinstalling the program.
Note
If a program freezes, you can’t shut it down using
conventional methods. If you try, you might see a dialog box warning you
that the program is not responding. If so, click End Now to force the
program to close. Alternatively, right-click the taskbar and then click
Task Manager. When you display the Applications tab, you should see your
stuck application listed, and the Status column will likely say Not responding. Click the program, and then click End Task.
Did You Recently Install a New Program?
If you suspect that a new program is causing system
instability, restart Windows Home Server and try operating the system
for a while without using the new program. (If the program has
components that load at startup, be sure to deactivate them. If the problem doesn’t recur, the new program is likely the culprit. Try using the program without other programs running.
You should also examine the program’s readme
file (if it has one) to look for known problems and possible
workarounds. It’s also a good idea to check for a version of the program
designed to work with either Windows Home Server or Windows Server
2008. Again, you can also try the program’s Repair option, or you can
reinstall the program.
Similarly, if you recently upgraded an existing program, try uninstalling the upgrade.
Tip
One common cause of program errors is having one or
more program files corrupted because of bad hard disk sectors. Before
you reinstall a program, run a surface check on your hard disk to
identify and block off bad sectors.
Did You Recently Install a New Device?
If you recently installed a new device or if you
recently updated an existing device driver, the new device or driver
might be causing the problem. Check Device Manager to see whether
there’s a problem with the device.
Did You Recently Install an Incompatible Device Driver?
Windows Home Server enables you to install drivers
that aren’t Windows Home Server-certified, but it also warns you that
this is a bad idea. Incompatible drivers are one of the most common
sources of system instability, so whenever possible, download and
install a driver that is designed for Windows Home Server.
If you can’t find a compatible driver, the next best
thing is to roll back the driver you just installed. Here are the steps
to follow:
1. | Select Start, Administrative Tools, Computer Management to open the Computer Management snap-in.
|
2. | Select Device Manager.
|
3. | Display the device for the driver that’s causing the problem.
|
4. | Double-click the device to open its property sheet.
|
5. | Display the Driver tab.
|
6. | Click Roll Back Driver.
|
Did You Recently Apply an Update from Windows Update?
If your system becomes unstable after installing an
update from Windows Update, in many cases you can uninstall the update.
Here are the steps to follow:
1. | Select Start, Control Panel, Programs and Features. Windows Home Server opens the Programs and Features window.
|
2. | Click View Installed Updates.
|
3. | Select the update you recently installed. (See Figure 2 for an example.)

|
4. | Click Uninstall. Windows Home Server asks you to confirm.
|
5. | Click
Yes to confirm that you want to remove the update. In most cases,
Windows Home Server prompts you to restart the computer to complete the
uninstall.
|
6. | Click Restart Now.
|
Tip
If you have Windows Home Server set up to perform
automatic updating, you can keep tabs on the changes made to your system
by viewing the update history. Select Start, Control Panel, Windows
Update, and then click the View Update History link.
Did You Recently Install a Windows Home Server Update?
It’s ironic that updates designed to increase system
stability occasionally do the opposite and cause more problems than they
fix:
If you’ve applied a hotfix, you can often
remove it using the Control Panel’s Programs and Features icon. Click
View Installed Updates, and then look for a Windows Home Server Hotfix
entry in the updates list. If you have multiple hotfixes listed, make
sure that you remove the correct one. To be sure, check with either the Microsoft
Security site or the Microsoft Knowledge Base, both of which I discuss
in the next section. Note, however, that you cannot uninstall most
hotfixes.
If you installed another type
of update, you can uninstall it using the Control Panel’s Programs and
Features icon. Look for a Windows Home Server update entry in the
installed programs list.